mardi 24 mai 2016

TOP 10 HACKERS OPERATING SYSTEMS

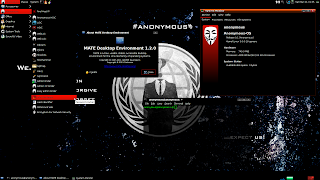
So today I come up with the operating systems that hackers used for hacking. The top on this list is the Kali Linux which has almost all type of hacking tools that are totally free for everyone. All operating systems are based on Linux kernel, we know the reason behind this fact, that Linux is free and open source.

Kali Linux

Kali Linux comes from the creators of BackTrack Yes you guessed it they are Offensive Security team. Kali Linux is the most versatile and advanced penetration testing distro. Kali Linux updates its tools, and it is available for many different platforms like VMware, ARM, and many more, one of my favorite is Kali Linux on Raspberry Pi. You can find all over here.  


BackBox


BackBox is a Linux distribution based on Ubuntu. It has been developed to perform penetration tests and security assessments. BackBox is lightweight OS and requires less hardware specification. Designed to be fast, easy to use and provide a minimal yet complete desktop environment, thanks to its own software repositories, always being updated to the latest stable version of the most used and best known ethical hacking tools.


DEFT


DEFT Association is an non-profit association. They provide a reliable and powerful Penetration testing distribution of Linux. You can download DEFT ISO or VMware virtual machine image from their official website.

Live Hacking OS


Live Hacking OS is also based on Linux, you know why. It is also a big pack of hacking tools used for Penetration testing. It includes the graphical user interface GNOME inbuilt. There is a second variation available which is command line only. And requires very less hardware requirement.


Samurai Web Security Framework


The Samurai Web Testing Framework is a live linux distro which is pre-configured with Web penetration testing tools. Yes this is the best for Web Penetration Testing and this is a live linux which is beneficial to clear all hacking tracks. You can download VMware image as well as ISO image from Sourceforge.


Network Security Tool Kit
Network security toolkit is based on Fedora and runs on 32 as well as 64 bit platforms. Network security toolkit provides tools to test, monitor and fix the network issues. The main purpose of developing this Toolkit is to provide the security professional and network administrator with a comprehensive set of Open Source Network Security Tools.


Parrot Security OS is a cloud friendly operating system designed for Pentesting, Computer Forensic, Reverse engineering, Hacking, Cloud pentesting, privacy/anonimity and cryptography. Parrot security os is based on Debian and developed by Frozenbox network. Parrot-sec is available in 32 bit for Intel processors and 64 bit for AMD. 


Bugtraq

Bugtraq Team is experienced freaks and developers. Bugtraq is available in Debian, Ubuntu, OpenSuSe in 32 and 64 bit architectures. Bugtraq system offers the most comprehensive distribution, optimal, and stable with automated services manager in real time. This distribution based on the 3.2 and 3.4 kernel.


Nodezero

Nodezero is very handy Penetration testing tools collection distro. They believe that Livecd is not for those who does Penetration testing on regular basis, but they provide livecd of their distro. Nodezero is reliable and stable. It is based on the Ubuntu distribution of  Linux. Download your free and open copy of NodeZero Linux today, because real hackers count from zero.

Pentoo


Pentoo is a security-focused Linux distro based on Gentoo. It is basically a Gentoo install with lots of customized tools, customized kernel, and more. Here is a list of the features currently included :


  • Hardened Kernel with aufs patches
  • Backported Wifi stack from latest stable kernel release
  • Module loading support ala slax
  • Changes saving on usb stick
  • XFCE4 wm
  • Cuda/OPENCL cracking support with development tools
  • System updates if you got it finally installed


GnackTrack


GnackTrack author is no longer updating its distro since the release of BackTrack5. GnackTrack is similar OS as BackTrack with the implementation of Gnome.

lundi 16 mai 2016

The 2016 Top Hacker Tools List!

nmap

 Link & Download: nmapThis tool is free to use!

Nmap is an abbreviation of 'Network Mapper', as is a very well known free open source hackers tool. Nmap is used for network discovery and security auditing. Many system admins use nmap for network inventory, open ports, managing service upgrade schedules, and monitoring host or service uptime. The tool uses raw IP packets in creative ways to determine what hosts are available on the network, what services (application name and version) those hosts are offering, what operating systems (and OS versions and possible patches) and what type and version of packet filters/ firewalls are being used by the target.
Nmap is a very popular hacking tool that was originally created to act as a method of being able to scan large networks, but it works absolutely fine o single hosts (targets). Nmap works on all major computer operating systems, and official binary packages are available for Linux, Windows, and Mac OS X. Nmap was traditionally a command-line tool, but there is a GUI available called 'Zenmap'.

Metasploit

 Link & Download: MetasploitThis tool is free to use!

The Metasploit Project is a widely used and extremely popular cybersecurity project that allows a penetration tester (or hacker) the ability to seek security vulnerabilities within networks and machines and is able to help audit systems. In addition, Metasploit also accommodates efficient management and testing of Intrusion Detection Systems. The most popular 'divison' of this 'multi purpose hacking tool' is the open source Metasploit Framework Project, commonly referred to as simply 'Metasploit'. This tool helps the user develop and execute (known or otherwise) exploit code against a remote target machine. Many Metasploit users use the tool for anti-forensic and evasion purposes, many of which are built into the Metasploit Framework.

Maltego

 Link & Download: MaltegoThis tool is free to use!


Maltego is a digital forensics platform that was created to deliver a cyber threat picture to the environment in which an organization operates. The unique perspective that Maltego offers to both network and resource based entities is the aggregation of information posted all over the internet - whether it's the current configuration of a router poised on the edge of your network or the current whereabouts of your Vice President on his international visits, Maltego can locate, aggregate and visualize this information.

OWASP Zed Attack Proxy Project

 Link & Download: OWASP Zed Attack Proxy ProjectThis tool is free to use!


The Zed Attack Proxy (ZAP) is now one of the most popular OWASP projects. This hacking and pentesting tool is a very efficient and 'easy to use' program that finds vulnerabilities in web applications. ZAP is a popular tool because it does have a lot of support and the OWASP community is really an excellent resource for those that work within Cyber Security.

ZAP provides automated scanners as well as various tools that allow you the cyber pro to discover security vulnerabilities manually. Understanding and being able to master this tool would also be advantageous to your career as a penetration tester.

To learn more about the OWASP Top Threats and Mitigations click here.

As ever, we'd really appeciate any comments you might have especially with regards to having used this tool. Please drop a comment below or indeed, you might have another video that we could include within this page?

Let us know what you think about this hacking tool or any other one!

mardi 3 mai 2016

How To Hack WPA/WPA2 Wi-Fi With Kali Linux & Aircrack-ng

07:45 Posted by gamaran , , , , No comments


          Kali Linux can be used for many things, but it probably is best known for its ability to penetration test, or “hack,” WPA and WPA2 networks. There are hundreds of Windows applications that claim they can hack WPA; don’t get them! They’re just scams, used by professional hackers, to lure newbie or wannabe hackers into getting hacked themselves. There is only one way that hackers get into your network, and that is with a Linux-based OS, a wireless card capable of monitor mode, and aircrack-ng or similar. Also note that, even with these tools, Wi-Fi cracking is not for beginners. Playing with it requires basic knowledge of how WPA authentication works, and moderate familiarity with Kali Linux and its tools. If you feel you have the necessary skills, let’s begin:
These are things that you’ll need:
  • A wireless adapter capable of injection/monitor mode. Some computers have network cards capable of this from the factory. If you’re, like most however, you’ll have to buy an external one. Here is a list of the best:   
    https://www.wifi-highpower.com
  • A wordlist to attempt to “crack” the password once it has been captured
  • Time and patients
If you have these then roll up your sleeves and let’s see how secure your network is!
          Important notice: Hacking into anyone’s Wi-Fi without permission is considered an illegal act or crime in most countries. We are performing this tutorial for the sake of penetration testing, hacking to become more secure, and are using our own test network and router.
------------------------------------------------------------------------
By reading and/or using the information below, you are agreeing to ourDisclaimer


Step One:
---------------------------------------------------------------------------
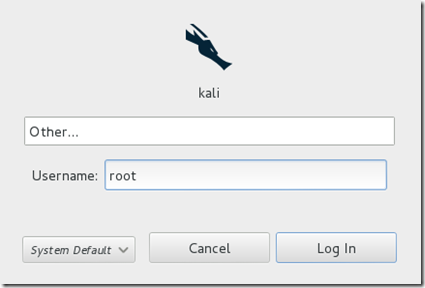
Start Kali Linux and login, preferably as root.
Step 1
Step Two:
Plugin your injection-capable wireless adapter, (Unless your native computer wireless card supports it). If you’re using Kali in VMware, then you might have to connect the card via the imageicon in the device menu.
Step Three:
Disconnect from all wireless networks, open a Terminal, and type airmon-ng
Step 3
This will list all of the wireless cards that support monitor (not injection) mode. If no cards are listed, try disconnecting and reconnecting the adapter (if you’re using one) and check that it supports monitor mode. If you’re not using an external adapter, and you still don’t see anything listed, then your card doesn’t support monitor mode, and you’ll have to purchase an external one (see the link in the requirements). You can see here that my card supports monitor mode and that it’s listed as wlan0.
Step Four:
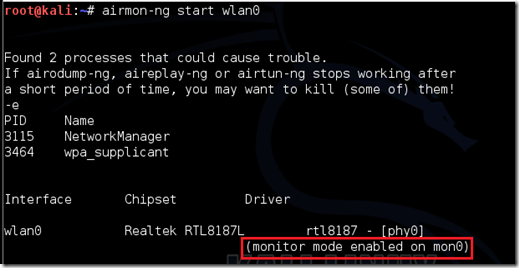
Type airmon-ng start followed by the interface name of your wireless card. mine is wlan0, so my command would be: airmon-ng start wlan0
Step 4
The “(monitor mode enabled)” message means that the card has successfully been put into monitor mode. Note the name of the new monitor interface, mon0.

EDIT:A bug recently discovered in Kali Linux makes airmon-ng set the channel as a fixed “-1” when you first enable mon0. If you receive this error, or simply do not want to take the chance, follow these steps after enabling mon0:
Type: ifconfig [interface of wireless card] down and hit Enter.
Replace [interface of wireless card] with the name of the interface that you enabled mon0 on; probably called wlan0. This disables the wireless card from connecting to the internet, allowing it to focus on monitor mode instead.
After you have disabled mon0 (completed the wireless section of the tutorial), you’ll need to enable wlan0 (or name of wireless interface), by typing: ifconfig [interface of wireless card] up and pressing Enter.


Step Five:
Type airodump-ng followed by the name of the new monitor interface, which is probablymon0.
Step 5
If you receive a “fixed channel –1” error, see the Edit above.
Step Six:
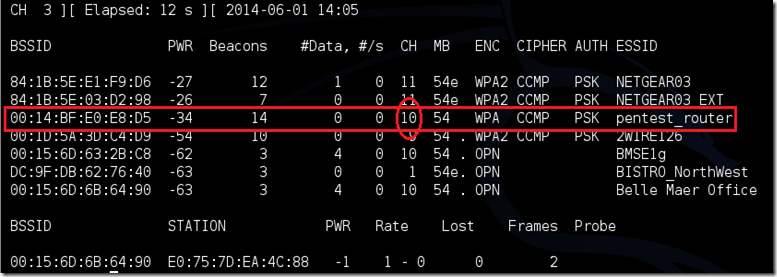
Airodump will now list all of the wireless networks in your area, and a lot of useful information about them. Locate your network or the network that you have permission to penetration test. Once you’ve spotted your network on the ever-populating list, hit Ctrl + C on your keyboard to stop the process. Note the channel of your target network.
step 6

Step Seven:
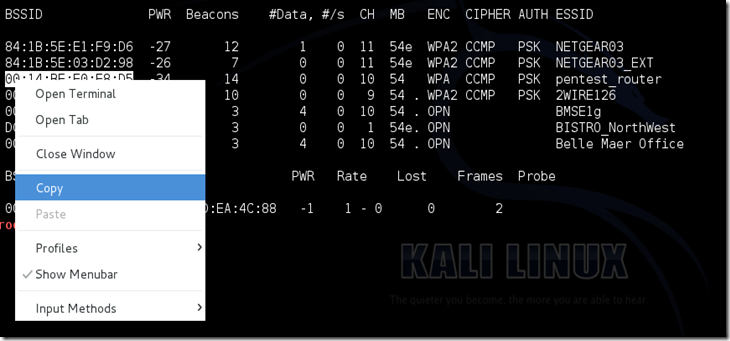
Copy the BSSID of the target network
Step 7

Now type this command:
airodump-ng -c [channel] --bssid [bssid] -w /root/Desktop/ [monitor interface]Replace [channel] with the channel of your target network. Paste the network BSSID where [bssid] is, and replace [monitor interface] with the name of your monitor-enabled interface, (mon0). The “–w” and file path command specifies a place where airodump will save any intercepted 4-way handshakes (necessary to crack the password). Here we saved it to the Desktop, but you can save it anywhere.

A complete command should look similar this:
airodump-ng -c 10 --bssid 00:14:BF:E0:E8:D5 -w /root/Desktop/ mon0

image
Now press enter.
Step Eight:
Airodump with now monitor only the target network, allowing us to capture more specific information about it. What we’re really doing now is waiting for a device to connect or reconnect to the network, forcing the router to send out the four-way handshake that we need to capture in order to crack the password.
Also, four files should show up on your desktop, this is where the handshake will be saved when captured, so don’t delete them!

But we’re not really going to wait for a device to connect, no, that’s not what impatient hackers do. We’re actually going to use another cool-tool that belongs to the aircrack suite called aireplay-ng, to speed up the process. Instead of waiting for a device to connect, hackers can use this tool to force a device to reconnect by sending deauthentication (deauth) packets to one of the networks devices, making it think that it has to reconnect with the network.
Of course, in order for this tool to work, there has to be someone else connected to the network first, so watch the airodump-ng and wait for a client to show up. It might take a long time, or it might only take a second before the first one shows. If none show up after a lengthy wait, then the network might be empty right now, or you’re to far away from the network.

You can see in this picture, that a client has appeared on our network, allowing us to start the next step.

Step 8
Step Nine:
Leave airodump-ng running and open a second terminal. In this terminal, type this command:
aireplay-ng –0 2 –a [router bssid] –c [client bssid] mon0The –0 is a short cut for the deauth mode and the 2 is the number of deauth packets to send.
-a indicates the access point/router’s BSSID, replace [router bssid] with the BSSID of the target network, which in my case, is 00:14:BF:E0:E8:D5.
-c indicates the client’s BSSID, the device we’re trying to deauth, noted in the previous picture. Replace the [client bssid] with the BSSID of the connected client, this will be listed under “STATION.”
And of course, mon0 merely means the monitor interface, change it if yours is different.

My complete command looks like this:
aireplay-ng –0 2 –a 00:14:BF:E0:E8:D5 –c 4C:EB:42:59:DE:31 mon0

Step 9
Step Ten:
Upon hitting Enter, you’ll see aireplay-ng send the packets. If you were close enough to the target client, and the deauthentication process works, this message will appear on the airodump screen (which you left open):
image

step 10
This means that the handshake has been captured, the password is in the hacker’s hands, in some form or another. You can close the aireplay-ng terminal and hit Ctrl + C on the airodump-ng terminal to stop monitoring the network, but don’t close it yet just incase you need some of the information later.
If you didn’t receive the “handshake message,” then something went wrong in the process of sending the packets. Unfortunately, a variety of things can go wrong. You might just be too far away, and all you need to do is move closer. The device you’re attempting to deauth might not be set to automatically reconnect, in which case you’ll either have to try another device, or leave airodump on indefinitely until someone or something connects to the network. If you’revery close to the network, you could try a WiFi spoofing tool like wifi-honey, to try to fool the device into thinking that you’re the router. However, keep in mind that this requires that you be significantly closer to the device than the router itself. So unless you happen to be in your victim’s house, this is not recommended.
Do note that, despite your best efforts, there are many WPA networks that simply can’t be cracked by these tools. The network could be empty, or the password could be 64 characters long, etc.
Step 11:
This concludes the external part of this tutorial. From now on, the process is entirely between your computer, and those four files on your Desktop. Actually, it’s the .cap one, that is important. Open a new Terminal, and type in this command:
aircrack-ng -a2 -b [router bssid] -w [path to wordlist] /root/Desktop/*.cap

-a is the method aircrack will use to crack the handshake, 2=WPA method.
-b stands for bssid, replace [router bssid] with the BSSID of the target router, mine is 00:14:BF:E0:E8:D5.
-w stands for wordlist, replace [path to wordlist] with the path to a wordlist that you have downloaded. I have a wordlist called “wpa.txt” in the root folder.
/root/Desktop/*.cap is the path to the .cap file containing the password. The means wild card in Linux, and since I’m assuming that there are no other .cap files on your Desktop, this should work fine the way it is.

My complete command looks like this:
aircrack-ng –a2 –b 00:14:BF:E0:E8:D5 –w /root/wpa.txt  /root/Desktop/*.cap
image

Now press Enter.
Step 12:
Aircrack-ng will now launch into the process of cracking the password. However, it will only crack it if the password happens to be in the wordlist that you’ve selected. Sometimes, it’s not. If this is the case, you can try other wordlists. If you simply cannot find the password no matter how many wordlists you try, then it appears your penetration test has failed, and the network is at least safe from basic brute-force attacks.
Cracking the password might take a long time depending on the size of the wordlist. Mine went very quickly.

If the phrase is in the wordlist, then aircrack-ng will show it too you like this:

image

The passphrase to our test-network was “notsecure,” and you can see here that it was in the wordlist, and aircrack found it.
If you find the password without a decent struggle, then change your password, if it’s your network. If you’re penetration testing for someone, then tell them to change their password as soon as possible.

lundi 2 mai 2016

La meilleur cartes WIFI compatibles pour Kali linux

20:49 Posted by gamaran , , No comments
Kali linux dispose de pilotes (drivers) permettant de tester la sécurité de réseaux sans fil (WIFI) WEP, WPA et WPA2.

Les cartes WIFI USB sont idéales pour les personnes utilisant un logiciel de virtualisation tel que VMWARE ou VirtualBox, en effet lors de l’utilisation de machine virtuelle, les cartes WIFI interne (PCI,…) ne sont pas utilisable, il est donc nécessaire d’acheter une carte WIFI externe en USB.
Cartes recommandées (compatibles Kali linux et tests d’intrusion) :
Cartes à éviter :
  • AWUS 036NHR.
Afin de vous garantir des produits originaux et testés, kali-linux.fr vous invite à n’acheter que des cartes WIFI chez un revendeur officiel Français comme wifi-highpower.fr :
fr0
Si vous utilisez un de ces cartes avec Kali linux installé en machine virtuelle, il vous faut au préalable installer le driver pour Windows disponible ici. Pour Windows 8, prendre le driver de Windows 7, choisissez la « Product category » = « Indoor Wireless » pour les cartes réseaux citées ci-dessus.

vendredi 17 juillet 2015

[Solution] Mot de passe oublier du root : Kali Linux

16:06 Posted by gamaran , , , , 4 comments


Vous venez d'installer Kali-Linux et en bon étourdi que vous êtes, vous avez déjà oublié le mot de passe de votre session root (je vous l'accorde, il faut vraiment le faire exprès!)

Voici une petite astuce qui vous sortira de ce mauvais pas en 2 coups de cuillère à pot:

Démarrer votre machine, sélectionnez le recovery mode et pressez la touche "e"                       


Maintenant, éditez de la façon suivante:

 
Puis CTRL +X pour démarrer, vous arrivez sur ceci:


On monte maintenant la partition qui nous intérresse:

Si vous avez un doute sur la partition à monter, utilisez la commande fdisk -l , puis lançer cette commande:

mount -o remount,rw /dev/sda1<---- (à adapter)


On utilise maintenant la commande passwd pour choisir un nouveau mot de passe:


Voila vous reste qu'a redemarrer

mercredi 9 juillet 2014

Comment ne pas se faire pirater sa boite mail ?

14:55 Posted by gamaran , No comments

La nouveauté en terme de cyberattaque ? Le pishing. Cette technique de piratage consiste en premier lieu à usurper l'identité d'une personne via la boîte mail. Une fois l'acte accompli, ils achetent des produits (chers) sur internet et se font passer pour la personne usurpée auprès des contacts mails. Au terme, la victime et ses contacts se font hacker. Cybercriminel : 1 / victime : 0.

Pour éviter ce cas de figure, une notion centrale est à aborder : la liste blanche. En terme informatique, la liste blanche est l'ensemble des données importantes de l'utilisateur. Comme sa liste de contacts et d'adresses mails. Le but de cette liste est la bonne réception des mails les plus utiles. Néanmoins, si un utilisateur reçoit un mail d'un de ses contacts victimes de pishing, il ne pourra rien faire. Ainsi, voici quelques points à respecter afin de préserver la liste blanche contre le pishing.

1. Ne pas ajouter son adresse mail dans sa liste blanche. S'envoyer un mail à partir de son adresse mail est une pratique peu commune. Dans le doute, mieux vaut laisser le filtre anti-spam jouer son rôle.

2. Ne pas donner un nom de rubrique trop explicite à sa liste blanche. Eviter les @orange, @shopping.com car aucun e-mail provenant de cette rubrique ne sera filtrés par l'outil anti-spam. C'est une porte ouverte au pishing.

3. Ne pas cliquer sur un mail aguicheur d'un expéditeur important (la banque, l'opérateur téléphonique). Il vaut mieux copier l'adresse sur internet pour voir où cela mène. Petite astuce en plus : en cas de soucis, la banque préfère le coup de téléphone  au message électronique.

4. Verifier que les liens d'adresse soient en "https" et non en "http". C'est la première garantie la sécurité du site. Toutefois, les adeptes du pishing se mettent aux URL "https".

5. Se mefier des mails suspects contenant des caractères spéciaux et des fautes d'orthographes grossières. Par exemple : "Bonjours Madame Dupont. voici votre @ttestation, cli_quez ici pour l'a recevoir #"

6. Pour vérifier une URL, passer la souris sur le lien sans cliquer et regarder l'adresse qui s'affiche en bas à gauche. S'il s'agit bien d'un spam, l'URL n'a aucune relation avec la banque ou l'entreprise dont le mail émanerait.

dimanche 6 juillet 2014

[Tuto]Utiliser metasploit web browser sous Kali-Linux 1.0

13:56 Posted by gamaran , , , No comments
== Description ==
Metasploit est un projet open source à l'origine développé en collaboration avec Rapid7 qui fournit des informations et des outils de pénétrations.
Il compte plus de 1000 exploits et 200 payloads et est entièrement écrit en ruby.
== Pré-requis ==
Etre root et pouvoir ajouter une exeption pour le certificat https sur iceweasel
Avoir la clé du produit.
== Installation ==
Lancez
le navigateur via le raccourcis depuis le menu "Applications -> Kali Linux -> Exploitation Tools -> Metasploit -> Metasploit community / pro"
http://pix.toile-libre.org/upload/img/1364751668.png
Une fois le navigateur ouvert cliquez sur le lien en bas de la page.
http://pix.toile-libre.org/upload/img/1364751931.png
Ajouter l'exception pour le certificat https afin de pouvoir accéder à la page d'installation de Metasploit.
http://pix.toile-libre.org/upload/img/1364752118.png
Et confirmer l'exception.
http://pix.toile-libre.org/upload/img/1364752167.png
L'installation prend environ 5 minutes profitez-en pour prendre une petit café ;-)
http://pix.toile-libre.org/upload/img/1364752296.png
Ensuite créez un utilisateur, personnellement en environnement de pentest, je prend root comme le nom d'utilisateur de la session.
http://pix.toile-libre.org/upload/img/1364752405.png
Il vous sera demandé de choisir un mot de passe robuste contenant au moins 8 caractères comprenant des chiffres des lettres et des  caractères spéciaux, sinon vous aurez ce message d'erreur.
http://pix.toile-libre.org/upload/img/1364752506.png
Puis vient le moment d'entrer votre clé de produit, si vous n'en n'avez pas, cliquez sur "GET PRODUCT KEY".
http://pix.toile-libre.org/upload/img/1364752603.png
Si c'est le cas vous avez le choix entre une version d’essais pro ou la free community.
http://pix.toile-libre.org/upload/img/1364752844.png
Il vous sera malheureusement demandé des information personnelles, sur lesquelles pour la version free j'ai menti en dehors de l'adresse mail qui est bien valide.
http://pix.toile-libre.org/upload/img/1364752938.png
Le mail qui vous servira à récupérer votre clé de produit à rentrer sur la page d'accès.
http://pix.toile-libre.org/upload/img/1364753064.png
Une fois la clé de produit rentrée, vous voilà dans la page d'accueil de Metasploit, l'installation est à présent terminée.
http://pix.toile-libre.org/upload/img/1364753130.png
== Utilisation de base ==
Une fois sur la page d'accueil, cliquez sur défault, ensuite sur scan pour tester des cibles potentielles sur le réseau local.
http://pix.toile-libre.org/upload/img/1364753258.png
Entrez l'adresse de la cible à tester.
http://pix.toile-libre.org/upload/img/1364753319.png
Laisser le scan se terminer, cela peut prendre quelques minutes, l'outil utilisant succèssivement des outils de scan tel que nmap etc...
http://pix.toile-libre.org/upload/img/1364753415.png
Une fois le scan terminé, un rapport détaillé s'affiche, ici la cible l'hôte de la machine virtuelle ou est utilisé kali est sécurisé à première vue.
http://pix.toile-libre.org/upload/img/1364753517.png
Pour des test plus poussé, il vous faudra attendre que je connaisse mieux l'outil en question, et que j'installe une metasploitable afin de pouvoir en faire un usage plus poussé.
== Voir aussi ==
** ( anglais ) ** http://www.metasploit.com/
Source : Coyotus Dot Com